The walking foot (or even feed foot) is the most basic and essential tool in your sewing kit, but it can be intimidating if you’ve never used one before.
If you have been using a regular sewing machine with an automatic needle positioner, then you may find that the walking foot makes your work easier and more precise when cutting out fabric pieces or stitching seams together.
It also allows you to sew at a faster pace because you don’t need to stop and reposition the presser foot every time you want to make another stitch.
With this in mind, let’s take a look at how to use a walk foot to make quilting much easier.
Step-By-Step: How to Use a Walking Foot for Quilting
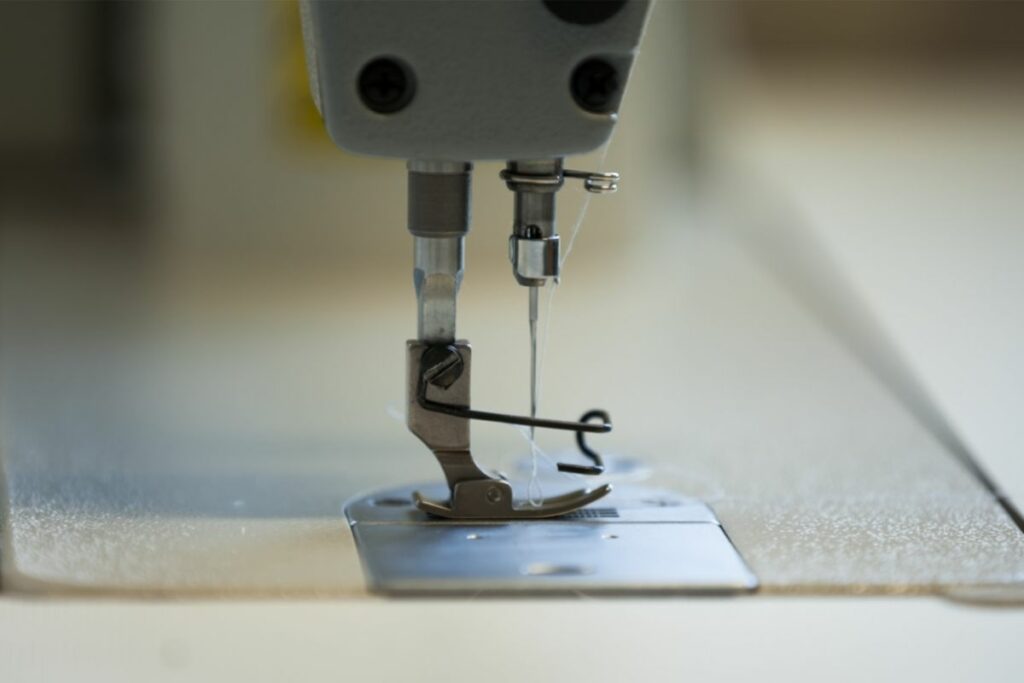
The first thing you should do is set up your sewing machine so that it has a free-moving needle. This means that the needle will not be attached to anything on the sewing machine except the bobbin case.
You can test whether your sewing machine has a free-moving or fixed needle by taking off the cover of the bobbin case and looking inside.
If there are no pins holding down the needle, then your sewing machine does indeed have a free-moving needle and you can continue on to setting up your walking foot.
You can either buy a new walking foot from your local sewing store or you can modify an existing foot. For example, you could remove the plastic part of the foot and replace it with wood or metal.
However, if you choose to modify a walking foot, then you must ensure that the original design of the foot remains intact. Otherwise, it won’t function properly.
With that out of the way, let’s look at how to use a walking fit in the step-by-step guide below:
Step 1: Adjust the Tension
To start, place the foot onto your sewing machine and adjust the tension until the needle moves smoothly through the fabric without any resistance.
Step 2: Turn the Dials
Next, turn the dials on the foot so that they match the size of the fabric piece you plan to cut out.
Now, you’ll need to decide which direction you would like your seam to travel. To help you decide, think about what type of fabric you’re working with.
For instance, if you are making a patchwork quilt, then you might want to sew along the edge of each individual fabric piece. In this case, you’d probably sew from left to right.
On the other hand, if you are making something like a pillowcase, then you’d probably want to sew across the width of the fabric. In this case, it would be best to sew from top to bottom.
Step 3: Choose the Correct Feed Dog
Once you’ve decided which way you’d like to sew, you’ll need to select the correct feed dogs.
There are two types of feed dogs: straight and zigzag. A straight feed dog only feeds the fabric in one direction while a zigzag feed dog feeds both directions.
In order to determine which feed dog you need, you’ll need to refer to the instructions that came with your sewing machine.
Step 4: Insert the Needle
Finally, you’ll need to insert the needle into the bobbin case. You can do this manually or you can attach the needle to the bobbin case using the thread winder.
If you are using a manual needle attachment method, you’ll need to pull back on the thread as far as possible before inserting the needle into the bobbin case.
If you are using the thread winder, simply push the knob toward the front of the sewing machine until the needle enters the bobbin case. Then, release the knob and let go of the thread.
Step 5: Stitching the Fabric
When you are finished cutting out the fabric pieces, you’ll need to stitch them together.
First, align the edges of the fabrics so that they are parallel to each other. Next, position the fabrics next to each other so that the sewn lines fall directly over the centerline of the sewing machine.
Then, take the needle and thread and begin stitching from one end of the fabrics to the other.
Continue stitching until all the fabrics have been joined together.
Step 6: Finished!
When you are done sewing, you should now have a perfectly lined and stitched patchwork quilt.
However, if you are not satisfied with the results, then you can always try another technique. For example, you could try free motion quilting instead.
Why Use a Walking Foot?
A walking foot is an essential tool for every quilter’s arsenal. It allows you to easily move the needle through the fabric at a consistent speed, ensuring precise stitches.
The most common use of a walking foot is when you are piecing a quilt. However, there are many more uses for a walking foot than just piecing a quilt!
You may also find yourself using a walking foot when you are appliquéing, embroidery, cross-stitch, or any type of sewing where you need to keep the same distance between the needle and the fabric.
You can use a walking foot to help guide you when you are doing free motion quilting. This allows you to create beautiful designs without having to worry about getting confused.
And finally, you might even use a walking foot when you’re making a long seam such as a binding or hemming.
Now that you know how to use a walking foot, you’ll be able to accomplish anything you want!
Final Thoughts
Using a walking foot is really easy and very simple. All you need to do is place it under the presser foot and adjust the tension accordingly.
Once you get used to using a walking foot, you won’t want to work without it anymore! Especially if you are working with fabric for things such as a quilt.
It makes sewing pieces of fabric together quicker and more straight forward.
My name is Sarah Maine and my hobby is quilting. No, I’m not retired - I’m in my early 20s and have been quilting since I was a teenager! Quilting and sewing are incredibly underrated hobbies in my opinion - and I want to bring them back.


")


